ADVERTISEMENT
Step-by-Step Instructions
Step 1: Melt the Chocolate and Peanut Butter
Start by melting the chocolate chips and peanut butter (or your choice of nut butter). You can do this in a microwave-safe bowl. Heat in 30-second intervals, stirring after each interval, until the chocolate is fully melted and the mixture is smooth.
Alternatively, you can melt them together over a stovetop on low heat, stirring constantly to avoid burning. The key is to make sure the chocolate and peanut butter are well combined.
Step 2: Sweeten and Flavor
Once the chocolate and peanut butter are melted and smooth, stir in the honey (or maple syrup), and vanilla extract (if using). This adds sweetness and depth of flavor to your dessert. Mix until everything is thoroughly combined.
Step 3: Add Optional Ingredients
At this point, you can get creative and add some optional ingredients:
- Stir in chopped nuts for extra texture and crunch.
- Add a handful of shredded coconut for a chewy, coconutty bite.
- For those who love a gooey, marshmallowy texture, toss in some mini marshmallows.
- If you like an extra chocolate boost, sprinkle in a spoonful of cocoa powder to deepen the chocolate flavor.
Step 4: Set the Dessert
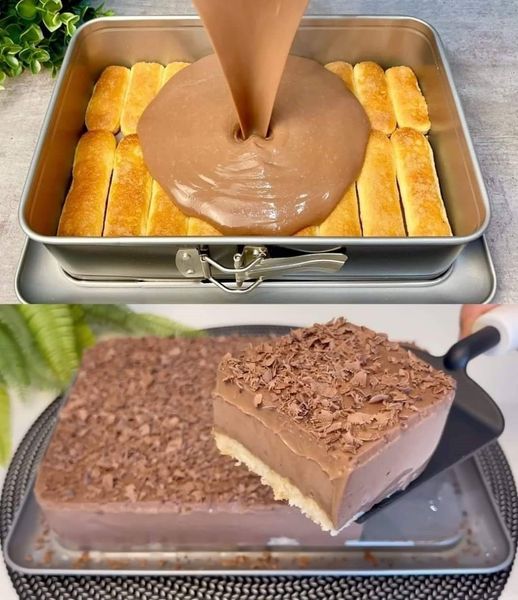
Once your mixture is fully blended, pour it into a small baking dish, tray, or even silicone molds if you want to shape them into individual servings. You can also line a baking sheet with parchment paper and pour the mixture directly onto it to form bars or squares.
Smooth the top with a spatula, ensuring the mixture is evenly spread out. If you’re feeling fancy, sprinkle extra chopped nuts or coconut flakes on top for a decorative touch.
Step 5: Chill and Enjoy!
Place your dessert in the fridge and chill for about 10 minutes, or until it sets up and hardens. If you’ve used small molds, it should be ready in about 10 minutes, but if you’ve made bars or squares, you may want to give them a little extra time (up to 30 minutes) for a firmer texture.
Once set, cut into squares, bite-sized pieces, or just scoop out spoonfuls—however you want to serve it!
Tips and Variations for Customizing Your Quick Dessert
- Use Different Nut Butters: You can switch out peanut butter for almond butter, cashew butter, or even sunflower seed butter to suit your taste or dietary needs.
- Add a Dash of Spice: Try adding a pinch of cinnamon or a dash of sea salt to enhance the flavor. A sprinkle of espresso powder can also give your dessert a coffee kick!
- Make It Vegan: To make this dessert vegan, simply use dairy-free chocolate chips, maple syrup instead of honey, and vegan nut butter (most nut butters are naturally vegan).
- Fruit Add-ins: For a fruity variation, consider stirring in dried fruit like cranberries, raisins, or chopped dried apricots. You can also top the dessert with fresh berries after it sets.
- Healthy Swaps: You can make this dessert even healthier by using dark chocolate with a higher cocoa content and swapping out the sweetener for a natural sugar alternative like stevia or coconut sugar.
Why This No Oven, No Flour Dessert is Perfect
- Fast and Easy: In just 10 minutes, you can have a delicious dessert that requires no baking or complicated techniques.
- No Flour: Whether you’re gluten-free or just avoiding flour, this recipe is naturally flourless and still totally satisfying.
- Minimal Clean-Up: With just a few ingredients and a single bowl for melting, clean-up is a breeze. It’s the perfect solution when you want a sweet treat but don’t want to spend too much time in the kitchen.
- Customizable: You can easily adjust the flavor and texture based on what you like. Add nuts, spices, or different sweeteners to make it uniquely yours.
Conclusion
When you’re craving something sweet but don’t want to bake or spend too much time in the kitchen, this No Oven, No Flour, Quick Dessert is your new best friend. It’s fast, easy, and incredibly versatile, so you can adjust it to your taste preferences and dietary needs.
In just 10 minutes, you can create a delectable, satisfying treat that will wow your family, friends, or yourself! Whether you’re whipping up a late-night snack or an impromptu dessert for guests, this recipe is the perfect sweet fix. Plus, with so few ingredients and no flour, it’s as simple as it is delicious.
So, the next time you need a quick dessert, give this recipe a try—you won’t regret it!
ADVERTISEMENT
