ADVERTISEMENT
Instructions:
1. Prepare the Pan:
- Preheat your oven to 400°F (200°C). Line the bottom and sides of a 9-inch springform pan with parchment paper, making sure the paper comes up above the sides of the pan (this is important because the cheesecake will rise while baking). Grease the pan with butter to ensure the paper sticks. The parchment paper should form an overhang around the pan to allow easy removal of the cheesecake later.
2. Mix the Cream Cheese and Sugar:
- In a large mixing bowl, beat the cream cheese and granulated sugar together with a hand mixer or stand mixer until the mixture is smooth and creamy—about 2-3 minutes. Scrape down the sides of the bowl as needed to make sure everything is incorporated.
3. Add Eggs and Vanilla:
- Beat in the eggs, one at a time, ensuring each egg is fully incorporated before adding the next. Then, add the vanilla extract and mix until combined. The batter should be smooth and slightly runny.
4. Incorporate the Flour and Heavy Cream:
- Add the flour and mix on low speed until just combined. Then, slowly pour in the heavy cream, continuing to mix on low until the batter is smooth and creamy. The batter should have a slightly thin, pourable consistency.
5. Bake:
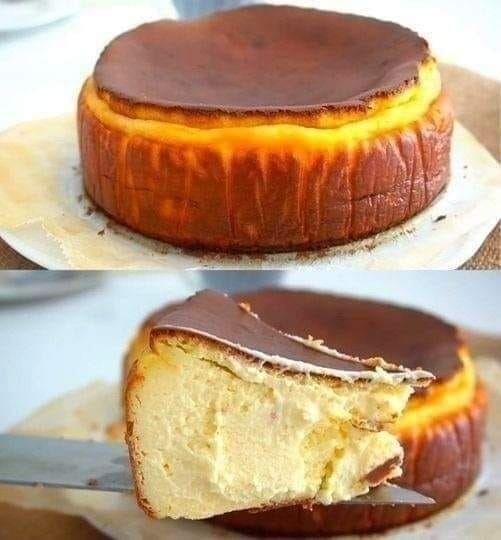
- Pour the batter into the prepared pan. Smooth the top with a spatula to ensure it’s evenly distributed. Bake in the preheated oven at 400°F (200°C) for about 50-60 minutes. The top of the cheesecake should be deeply browned and even a bit charred. The center may still jiggle slightly when you shake the pan, but it will firm up as it cools. Don’t worry if the top cracks—that’s normal and part of the rustic charm of this cheesecake!
6. Cool and Set:
- Let the cheesecake cool at room temperature for about 1-2 hours. As it cools, the top will settle and the texture will become creamier. Afterward, transfer the cheesecake to the fridge and chill for at least 4 hours (preferably overnight) to allow the flavors to develop and the cheesecake to fully set.
7. Serve:
- Once chilled, remove the cheesecake from the pan using the parchment paper. Slice it with a sharp knife, wiping the blade between cuts for clean slices. Serve chilled, or at room temperature, depending on your preference.
Why This Recipe Works
The Burnt Basque Cheesecake relies on a few simple techniques that come together perfectly to create its unique texture and flavor:
- High Baking Temperature: Baking the cheesecake at a high temperature (400°F or 200°C) is what gives the dessert its signature caramelized, burnt exterior. This creates a wonderful contrast with the creamy, custardy interior, making every bite satisfying.
- Minimal Ingredients: This cheesecake doesn’t require a graham cracker crust, water bath, or any complicated steps. The simplicity of the ingredients—cream cheese, eggs, sugar, and flour—lets the natural flavors shine.
- No Cracking: Unlike traditional cheesecakes that can crack due to their slow cooking process, this one is baked quickly, so the cracks are part of its charm, not a flaw. The slightly “burnt” edges create a depth of flavor that is unmatched in most cheesecakes.
Tips for Success
- Room Temperature Ingredients: Make sure your cream cheese, eggs, and heavy cream are at room temperature before you begin. This helps to create a smooth batter with no lumps.
- Don’t Overmix: When mixing the batter, be careful not to overwork it. Overmixing can cause air bubbles to form, which might affect the texture of the cheesecake.
- Watch the Bake Time: Every oven is different, so keep an eye on the cheesecake towards the end of the baking time. You want the top to be golden-brown and caramelized, but not burnt to the point of being bitter. If you’re unsure, you can always check the cheesecake by gently shaking the pan—it should jiggle slightly in the center but not be liquid.
- Chill for Best Results: While it’s tempting to dig in immediately, the cheesecake benefits from chilling. It gives the flavors time to meld and makes slicing much easier.
- Flavor Variations: If you want to experiment, you can add a little citrus zest, like lemon or orange, to the batter, or even fold in some chocolate chips for a decadent twist. The beauty of this cheesecake is in its versatility!
Why You’ll Love Burnt Basque Cheesecake
- A Showstopper Dessert: The burnt, caramelized top gives this cheesecake an alluring appearance that’s sure to impress anyone you serve it to. It’s a conversation starter and a delicious treat rolled into one.
- Simple, Yet Sophisticated: Despite its humble ingredients, this cheesecake tastes luxurious. Its texture is rich and creamy, and the slight char on the top brings out the complexity of flavors, making each bite unforgettable.
- No Fuss: Unlike traditional cheesecakes that often require careful attention and a water bath, this recipe is straightforward, forgiving, and easy to make. There’s no need for a perfect crust or flawless presentation—just a stunning, rustic cheesecake that’s as delicious as it is beautiful.
Conclusion: A Cheesecake Like No Other
The Burnt Basque Cheesecake is a true showstopper in every sense of the word. It combines the richness of a classic cheesecake with a wonderfully crispy, caramelized top, resulting in a dessert that’s as unique as it is delicious. Whether you’re looking for a new twist on a classic or simply want a cheesecake that’s easy to make and full of flavor, this recipe will not disappoint.
So, preheat your oven, gather your ingredients, and get ready to bake the most impressive, melt-in-your-mouth cheesecake you’ve ever made. You’ll be so glad you did!
ADVERTISEMENT
