ADVERTISEMENT
Instructions:
1. Activate the Yeast:
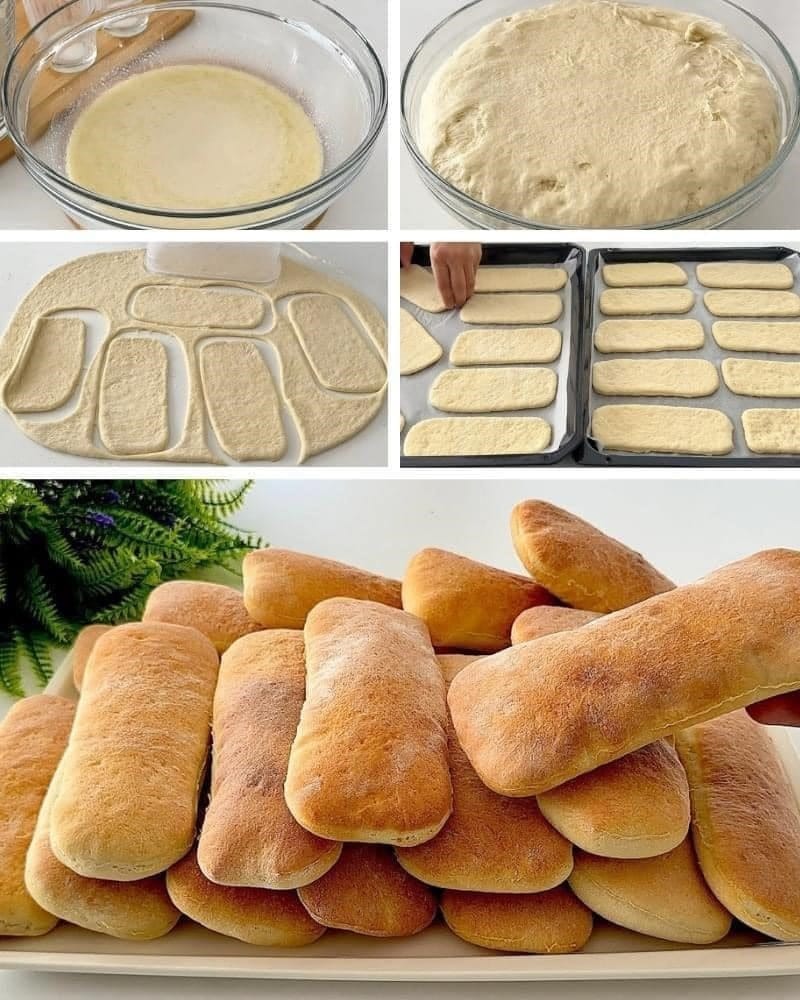
In a small bowl, combine the warm milk, warm water, and sugar. Stir until the sugar dissolves. Sprinkle the active dry yeast over the liquid, and let it sit for about 5 minutes, or until it becomes foamy. This step is crucial, as it ensures the yeast is alive and active, which will help your bread rise properly.
2. Make the Dough:
In a large mixing bowl, combine the flour and salt. Once the yeast mixture is ready, pour it into the flour mixture, along with the melted butter. Stir with a wooden spoon or spatula until the dough begins to come together.
If the dough seems too sticky, add a little more flour, a tablespoon at a time, until it forms a soft, workable dough. Turn the dough out onto a lightly floured surface and knead it for about 5-7 minutes, or until it’s smooth and elastic.
3. First Rise:
Shape the dough into a ball and place it in a lightly oiled bowl. Cover the bowl with a clean kitchen towel or plastic wrap and let it rise in a warm place for 1 to 1.5 hours, or until it has doubled in size. The warmth helps activate the yeast, allowing the dough to rise and become light and fluffy.
4. Shape the Balloon Bread:
Once the dough has risen, punch it down gently to release the air. Turn it out onto a lightly floured surface. Divide the dough into 8 to 10 equal pieces, depending on how large you want the bread to be.
Roll each piece of dough into a ball. Here’s where the magic of “balloon” bread happens! Take each ball of dough and gently stretch the top to form a smooth, taut skin, then place the dough ball on a parchment-lined baking sheet. The dough will naturally puff up as it bakes, creating a balloon-like effect.
5. Second Rise:
Once all the dough balls are shaped, cover the baking sheet with a clean kitchen towel and let the dough rise again for about 30-45 minutes. This second rise allows the bread to become even fluffier and puffier.
6. Preheat the Oven:
While the dough is rising, preheat your oven to 375°F (190°C). The oven needs to be hot to help the balloon-like puffing action as the dough bakes.
7. Brush with Egg Wash:
Just before baking, brush the tops of each dough ball with a light coating of beaten egg. This gives the bread a beautiful golden color and adds a slight sheen to the crust once it’s done baking.
8. Bake the Balloon Bread:
Bake the dough for 18-20 minutes, or until the tops are golden brown and the bread sounds hollow when tapped on the bottom. The inside should be soft and fluffy, and the outside should have a nice, golden crust.
9. Cool and Serve:
Once baked, remove the bread from the oven and let it cool on a wire rack for a few minutes. Serve these adorable balloon bread rolls warm with butter, honey, or your favorite dipping sauce. They’re perfect for a cozy dinner, or as a fun side to soups, stews, and salads.
Tips for Success:
- Don’t Rush the Rise: The key to getting that soft, airy texture is allowing the dough to rise properly. Be patient during both the first and second rises. If your kitchen is cold, you can place the dough in an oven that’s been preheated to a very low temperature (about 100°F) and then turned off.
- Shaping the Dough: Be gentle when shaping the dough into balls. The goal is to create a smooth, taut surface to help the dough puff up nicely in the oven.
- Flavor Variations: For an extra burst of flavor, you can brush the balloon bread with garlic butter or sprinkle it with herbs before baking. You can also add grated cheese or herbs into the dough for a savory twist.
- Storage: If you have leftover balloon bread (which is rare!), you can store it in an airtight container for up to 2 days. To reheat, simply wrap the bread in foil and place it in a preheated oven at 350°F for about 10 minutes.
Why Balloon Bread Is So Special:
- Fluffy and Light: The dough is perfectly soft and pillowy, thanks to the double rise and the gentle shaping technique. The bread has an airy, almost “balloon-like” texture that makes it melt in your mouth.
- Fun to Make and Eat: Balloon bread is as fun to make as it is to eat. Kids will love shaping the dough into little puffed-up balls, and everyone will enjoy tearing into the warm, fluffy bread.
- Versatile: These rolls can be served with almost anything! Pair them with soups, stews, salads, or even as a snack with a little butter or jam. They can also be the perfect side dish for holiday dinners or special occasions.
- Impressive Yet Simple: While the bread has a beautiful, rustic look, it’s surprisingly simple to make. You don’t need any fancy ingredients or tools to achieve this delightful effect.
Final Thoughts:
Balloon bread is the perfect combination of fun and flavor, making it a fantastic addition to your bread-baking repertoire. The soft, fluffy texture and playful shape are sure to impress everyone at the table, whether you’re serving it as a casual weeknight dinner bread or for a festive meal.
With a few simple ingredients and some patience, you’ll have delicious, balloon-like rolls that will be the star of your next meal.
Give it a try and let the balloon bread bring a little extra joy to your baking!
Happy baking! 🍞🎈
ADVERTISEMENT
